In the previous article we learned how to setup an Angular 2 development environment with NetBeans & Node.js & Angular CLI & Grunt. Now, we’ll learn how to create a deployable web archive, a WAR file.
Previous article:
Previous article:
Let’s create a new Angular 2 web application. To do this, open a command line, and type
ng new angular2-app --skip-git
--skip-git is necessary if you don’t want to create a repository for your project. If you did it well, you’ll get this on your screen:

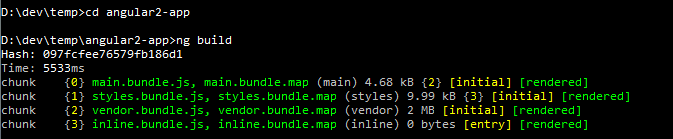
You can test it in your browser, but first you have to build it with “ng build”.
To start it, type “ng serve” as Angular CLI documentation offered:


Install grunt-war
This module is a useful module for creating war files. To install it, type in your console in the project folder:
npm install grunt-war --save-dev
After that you’ll find a new line in your package,json:
"grunt-war": "^0.5.1",
Configure Grunt
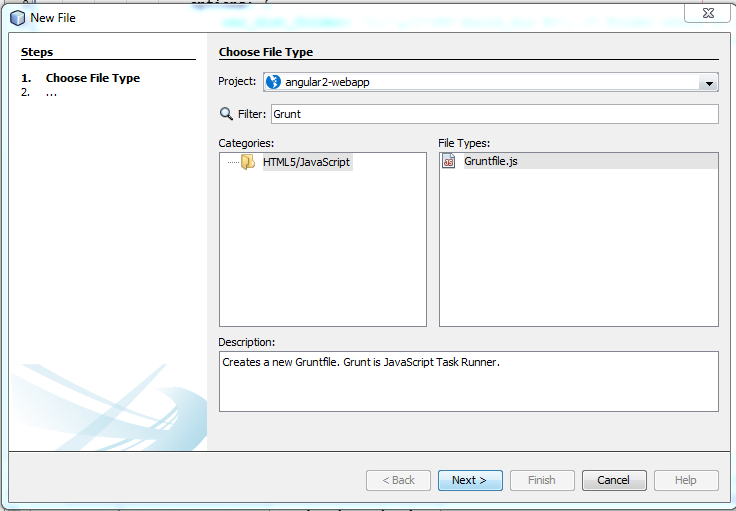
To set up Grunt task, you have to edit Gruntfile.js. If you don’t have one, just create it in the root folder inside the project directory, and then open it. In NetBeans, the easiest way to create one, select the project and right click on it, and select “New > Other”. Let’s start typing “grunt”, then select Gruntfile.js, and press Finish.
An empty Gruntfile looks this:
/*
* To change this license header, choose License Headers in Project Properties.
* To change this template file, choose Tools | Templates
* and open the template in the editor.
*/
module.exports = function (grunt) {
// Project configuration.
grunt.initConfig({
});
};
Modify the file with the following lines marked with yellow.
module.exports = function (grunt) {
grunt.loadNpmTasks('grunt-war');
// Project configuration.
grunt.initConfig({
pkg: grunt.file.readJSON('package.json'),
war: {
target: {
options: {
war_dist_folder: 'd:/', /* Folder where to generate the WAR. */
war_name: 'angular2-webapp' /* The name fo the WAR file (.war will be the extension) */
},
files: [
{
expand: true,
cwd: 'dist',
src: ['**'],
dest: ''
}
]
}
}
});
grunt.registerTask('default', ['war']);
};
If you reload your project, you can find in your Grunt tasks the “war” task. Right click on the project, and “Grunt tasks > war”. Select it, and then you’ll see something like this in your console output:

Open the generated WAR file, and check it’s content:


